
Holographic Shimmer
China Glaze Spring 2008 – OMG! 2BKEWL
 It’s rare that a nail polish collection comes out with so much pre-sale buzz as this OMG! Collection from China Glaze. Now I don’t know if it was part of their marketing scheme but a few lucky MUA members were able to find these beauties prior to release and it certainly drummed up a lot of excitement.
Just as I’m not a sheer girl, I know not everyone is a holo lover. It’s a lot of sparkle and shimmer to pull off and not necessarily appropriate for all occasions. Not that it stops me from wearing them. I can’t help but be mesmerized by my rainbow nails when ever the light hits them. So when I laid my eyes on these colors, I swooned a bit.
The OMG! collection lacquers are all very pigmented and opaque with two coats. They dry to a smooth matte finish so you really need a top coat to make them glossy. Though considering how many people are looking for a matte top coat, you might like these on their own. The images below are without a top coat and to be honest, they are a good but not great color representation. The shades are a bit bolder in person but I think the finish prevented me from capturing that.
Normally I would do individual reviews but I feel the pics speak for themselves. The formula and application is consistent through all the colors; a bit on the thick side but still even. I did end up with a bit of cuticle dragging from OMG but that issue could have been due to rushing between coats.


The OMG! collection has just started shipping out so look for them at your favorite China Glaze retailer. Stay tuned for 2BHOT Collection swatches tomorrow.
Customization: Frankenpolish & The Art Of Layering
 Ask any beauty junkie and we’ll admit, no matter how many shades, fragrances or formulations are thrown our way we are still restless for more. Even if we find that perfect product, after a while we’ll wish it was a bit more “something”. Deeper in color, smoother in feel, slightly more floral, etc. Let’s face, it we’re just never satisfied.
As we’ve learned from magazines, makeup artists and our fellow product junkies, beauty is like Burger King; we can have it our way. All it takes is a little customizing. Whether it’s layering your favorite perfumes to create a signature scent, mixing your moisturizer in with your foundation to make it sheer and dewy or blending eight different shadows to achieve that perfect smokey eye we love to alter and combine our favorite products.
In the world of lacquer it’s no different. When we can’t find the color we want we become kids again, mixing lacquer like we used to mix our finger paints. It’s all about experimenting, letting your imagination go and relying on our childhood art lessons about the color wheel. Say it with me folks, yellow and blue make green. Now I’m having Ziploc commercial flashbacks.
There are two methods of customizing polish:
- Layering – Using multiple layers of different colors to create the desired shade
- Mixing – Combining two or more lacquers in a bottle (aka Frankenpolish)
First let’s discuss the easiest way to customize your color, layering. It’s very no muss, no fuss. The only real trick is making sure the edges of each layer line up. If you have a shade that is too light or dark, layer it over white or black. Is your polish to sheer? Layer it over a similar hued opaque formula or black. Everything looks more intense over black. Love the shade of your chrome or metallic finish polish but hate the brush strokes? Add a sheer on top to achieve a smoother finish. Here are some examples from my own experiments.
I was so excited when I got China Glaze Kaleidoscope Him Out and He’s Going In Circles because not only are they holographic but they’re blue and green holos. Unfortunately, I didn’t feel that the green and blue made enough of an impact.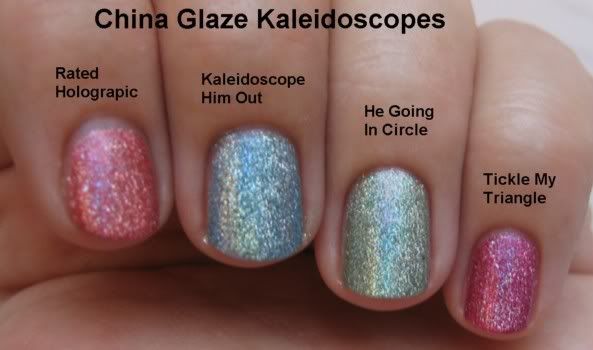
So I layered them over opaque creme lacquers and pow! Instant intensity.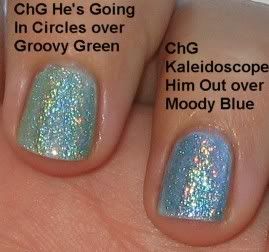
Here’s an example of how I combated brush strokes in a metallic finish. I love the color of China Glaze Open Sky but the finish left something to be desired. So I turned to a holo for help. Adding a layer of OPI Blue Moon Lagoon didn’t alter the beauty of Open Sky, it just added a little bling and a smoother look.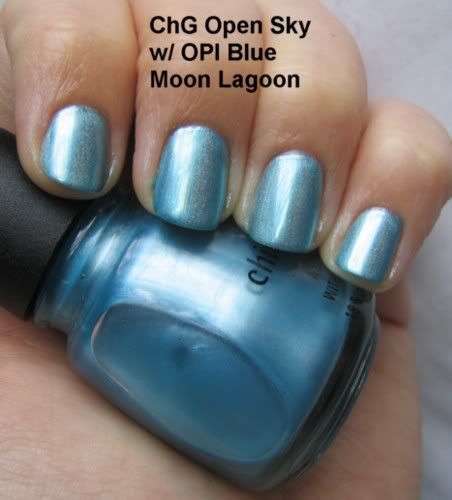
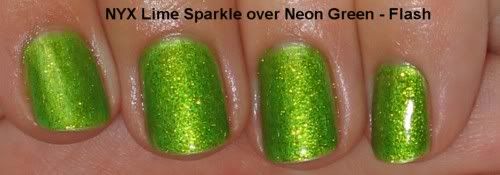
These two were just for fun. I love my greens but a girl can never have enough options.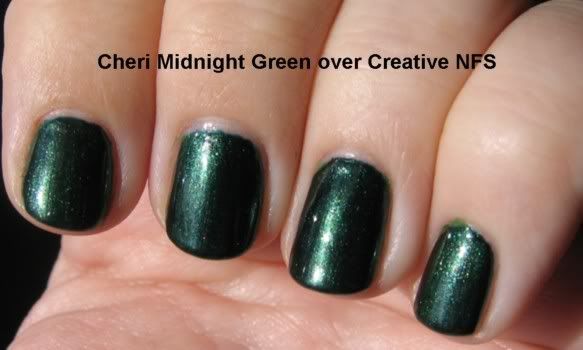
Now on to the science project that is the Frankenpolish.
My first try at making my own polish was to mix MAC pigment with clear lacquer. Mixing pigments can be a lot of work but if you have a gorgeous shade that would look great on your nails, it’s worth it. I buy Milani clear polish but others like using Sally Hansen Insta Dri. I add 1/4 tsp. of pigment at a time and mix, mix, mix before I test it on the nail. Just keep adding pigment until you’ve reached the desired opacity. If you can, add a couple mixing balls because the pigment will settle out when not in use.
Here are the results of my first ever pigment mix. This is MAC Entremauve in Milani Crystal Clear lacquer. The pink sparkles in Entremauve really pop as a polish.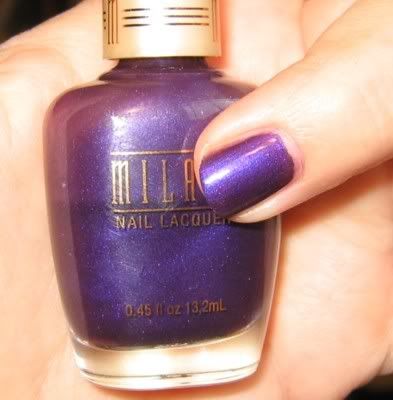
The other method for mixing your own polish is to combine different lacquers to create a new shade. The true Frankenpolish.
Disclaimer: Due to the volatile nature of nail lacquer ingredients I do not condone or promote mixing formulas from different manufacturers. There is no way to know if they will safely combine. So franken at your own risk.
For great tips on the supplies, process and recipes, check out the Frankenpolish Notepad on Makeup Alley. Bravo to Christine from 15 Minute Beauty Fanatic for creating it and to all the lovely MUA members that contribute to it.
These lovely frankens are the creation of MUA member jennyferr.
45% OPI Lincoln Park After Dark, 10% Black

Camouflage, 1/3 Zoya Tangy

Now it’s your turn. Share your favorite layering combos and recipes.
photos: All Lacquered Up and jennyferr on MUA
New OPI Designer Series
 Just released, the new Designer Series polishes from OPI. Being a holographic glitter junkie isn’t easy. As much fun as it is having a prismatic rainbow on your nails, it’s not always appropriate or safe. There’s been times that I’ve found myself distracted by the sun catching my holo mani while driving. Shh, don’t tell the police.
So now to add to my already large collection of “shiny object” distractions comes Fantasy and Diamond. I don’t have these little beauties in my hands yet but I will give proper reviews as soon as I do.
From what I can tell, Fantasy looks like a navy blue holo. I’d imagine it’s what we originally anticipated DS Glamour being. Don’t get me wrong I LOVE Glamour, it’s one of my holy grail pedicure shades but I know that in addition to the clamoring for a black holo (OPI My Private Jet) a navy holo was on many a wish list. Let’s cross our fingers and toes that this is it.
 Now I don’t want to pass judgement without seeing Diamond in person but I’m guessing it won’t be a very “me” shade. It looks pewter and I don’t don’t do silvers very well. If I do a metallic, it’s usually gold. I’m keeping and open mind though.
 These new Designer Series polishes are now available on Head2Toe Beauty’s website. Don’t crash their server!
photos: Head2Toe Beauty
Avon Nailwear Kaleidoscope Shades
 I’ve never tried Avon polish before. I never had a reason to. Well, when I heard they had new colors called Kaleidoscope Shades, my interest was instantly piqued.
They are described by Avon as “Strong wear with real diamond dust…now in NEW Kaleidoscope shades – with an iridescent pearl lustre! 10-day performance with normal touch-ups.”
On sale for $2.95, I figured they were worth a shot. I ordered 5 of the 6 colors and eagerly opened the box when it arrived today. Upon first glance, they reminded me of the Sally Hansen Prisms, minus the holographic effect. I’m sure the bottle shape somewhat influenced that.
I wish the polish would have lived up to my initial excitement. I’ve never been so disappointed with a brand or individual polish. I don’t feel bad at all by saying that this product is crap.
First of all, the brushes in every bottle were flawed in some way. The worst was shaped like a crescent moon and made application near impossible. They were all bent or splayed to some extent. You can’t do a proper manicure with a bad brush. Period.
Due to the poor brushes, the application was terrible. I had to redo the initial swatch manicure pictured below twice. No matter how much polish I wiped off the brush before stroking it on, I still had pools of lacquer on the sides of my nails. To top it all off, I ended up with air bubbles. I know there are plenty of causes for bubbling but I used the same products and techniques that I always do. The only difference was the polish brand.
Considering how sheer the shades are, I decided to give them a 2nd chance by layering them over my favorite black creme polish, Sinful Colors Black on Black. I really hoped the experiment would work out but none of the combinations impressed me and I was plagued by polish bubbles again.
In summary, save your money people!! Don’t let the pics of the pretty colors fool you. Go check out your local drugstore and pick up some of the great polishes being clearanced instead. Just the other day I snagged a couple of great Orlys from CVS on sale for 75% off. I’ve also seen sales on Sally Hansen Prisms at Walgreens. They are a thousand times better than anything Avon’s got.


OPI Designer Series Comparison Pics
Here are some comparion pics of the new Designer Series polishes. Just trying to save you all a few dollars in case you already own some of these.

 To my eye, Amethyst is a bit more pink than Sand-erella and has way more holo bling.
Glamour is truly unique and I couldn’t think of a color combination that would come close. The burple (bluish-purple) base is very unique.
Passion is more rose toned than Elegance. I thought for sure that they’d be twins. Passion is definitely a more muted pink than Elegance. As much as I was initially unimpressed with it, I’m now happy to have it based on this comparison.
Desire is Design’s darker, more bronze, winterish sibling. Because of the amount of holographic shimmer in Desire, it’s hard to catagorize it as a warm or cool color. The base is definitely warm but when the light isn’t causing the holo to show off it’s rainbow beauty, the shimmer looks silver.
For anyone that hasn’t tried this line, the glitter is as smooth as the diamond dust formula is to apply. I love that it’s easy to remove and doesn’t give you that nails on a chalkboard feeling as you rub it off, like with a lot of glitter polishes.


