
Customization: Frankenpolish & The Art Of Layering
 Ask any beauty junkie and we’ll admit, no matter how many shades, fragrances or formulations are thrown our way we are still restless for more. Even if we find that perfect product, after a while we’ll wish it was a bit more “something”. Deeper in color, smoother in feel, slightly more floral, etc. Let’s face, it we’re just never satisfied.
As we’ve learned from magazines, makeup artists and our fellow product junkies, beauty is like Burger King; we can have it our way. All it takes is a little customizing. Whether it’s layering your favorite perfumes to create a signature scent, mixing your moisturizer in with your foundation to make it sheer and dewy or blending eight different shadows to achieve that perfect smokey eye we love to alter and combine our favorite products.
In the world of lacquer it’s no different. When we can’t find the color we want we become kids again, mixing lacquer like we used to mix our finger paints. It’s all about experimenting, letting your imagination go and relying on our childhood art lessons about the color wheel. Say it with me folks, yellow and blue make green. Now I’m having Ziploc commercial flashbacks.
There are two methods of customizing polish:
- Layering – Using multiple layers of different colors to create the desired shade
- Mixing – Combining two or more lacquers in a bottle (aka Frankenpolish)
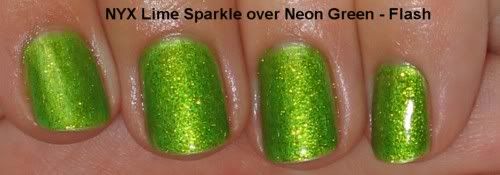
First let’s discuss the easiest way to customize your color, layering. It’s very no muss, no fuss. The only real trick is making sure the edges of each layer line up. If you have a shade that is too light or dark, layer it over white or black. Is your polish to sheer? Layer it over a similar hued opaque formula or black. Everything looks more intense over black. Love the shade of your chrome or metallic finish polish but hate the brush strokes? Add a sheer on top to achieve a smoother finish. Here are some examples from my own experiments.
I was so excited when I got China Glaze Kaleidoscope Him Out and He’s Going In Circles because not only are they holographic but they’re blue and green holos. Unfortunately, I didn’t feel that the green and blue made enough of an impact.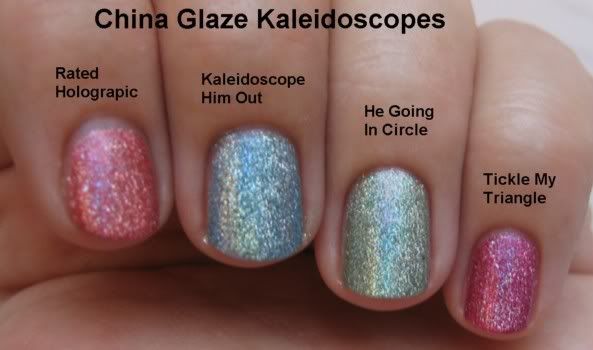
So I layered them over opaque creme lacquers and pow! Instant intensity.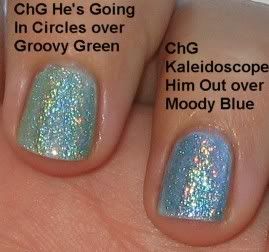
Here’s an example of how I combated brush strokes in a metallic finish. I love the color of China Glaze Open Sky but the finish left something to be desired. So I turned to a holo for help. Adding a layer of OPI Blue Moon Lagoon didn’t alter the beauty of Open Sky, it just added a little bling and a smoother look.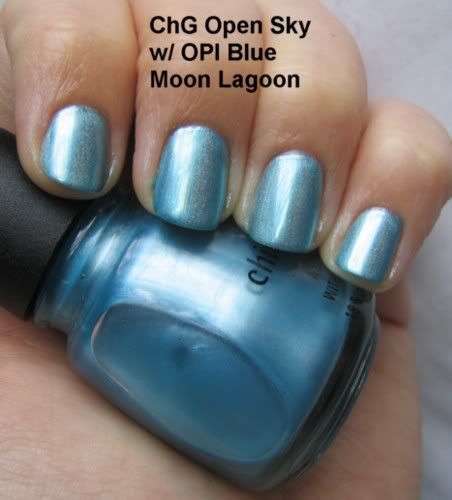
These two were just for fun. I love my greens but a girl can never have enough options.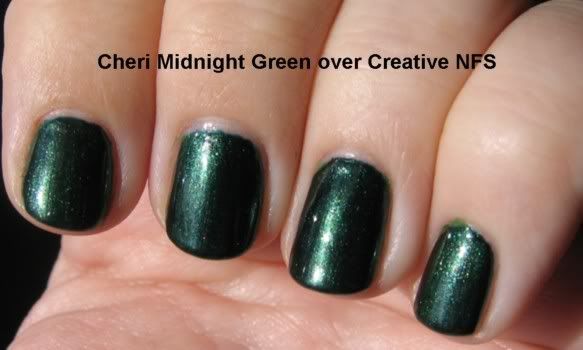
Now on to the science project that is the Frankenpolish.
My first try at making my own polish was to mix MAC pigment with clear lacquer. Mixing pigments can be a lot of work but if you have a gorgeous shade that would look great on your nails, it’s worth it. I buy Milani clear polish but others like using Sally Hansen Insta Dri. I add 1/4 tsp. of pigment at a time and mix, mix, mix before I test it on the nail. Just keep adding pigment until you’ve reached the desired opacity. If you can, add a couple mixing balls because the pigment will settle out when not in use.
Here are the results of my first ever pigment mix. This is MAC Entremauve in Milani Crystal Clear lacquer. The pink sparkles in Entremauve really pop as a polish.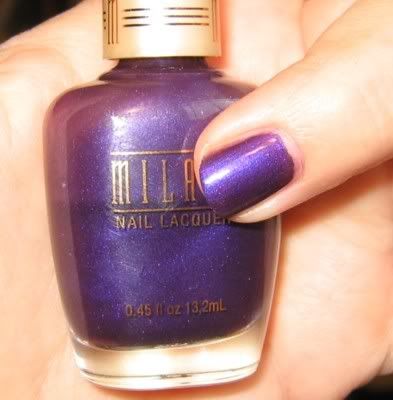
The other method for mixing your own polish is to combine different lacquers to create a new shade. The true Frankenpolish.
Disclaimer: Due to the volatile nature of nail lacquer ingredients I do not condone or promote mixing formulas from different manufacturers. There is no way to know if they will safely combine. So franken at your own risk.
For great tips on the supplies, process and recipes, check out the Frankenpolish Notepad on Makeup Alley. Bravo to Christine from 15 Minute Beauty Fanatic for creating it and to all the lovely MUA members that contribute to it.
These lovely frankens are the creation of MUA member jennyferr.
45% OPI Lincoln Park After Dark, 10% Black

Camouflage, 1/3 Zoya Tangy

Now it’s your turn. Share your favorite layering combos and recipes.
photos: All Lacquered Up and jennyferr on MUA


LOVE THE IDEA OF MIXING PIGMENTS WITH CLEAR. GOTTA GIVE THAT A TRY!
LOVE YOUR BLOG TOO, BEEN READING FOR ALMOST 10 MONTHS, SO GLAD THERE ARE OTHER NAIL POLISH NUTS OUT THERE, COLLECTING POLISH IS BETTER THAN CHOCOLATE, AT LEAST IT DOESN’T PUT ON WEIGHT. KEEP UP THE GOOD WORK!
DO YOU KNOW ANYTHING ABOUT THE NICOLE POLISH, I’M DYING TO GET COZY RED ROSIE. MARYO
In response to the question posted by anonymous, I think you can get Cosy Red Rosie at Target if you are near a Target that carries Nicole and OPI (not all Targets do).
Thanks for the info Hillary!
Anon – I’m glad you’re enjoying the blog so much. I’ve seen the new Nicole polishes at my local Walgreens. I just saw an ad in this month’s Glamour or Instyle for the new colors, including Cozy Red Rosie, so I have a feeling that within the next month or so, they’ll be more widely available. Just keep stalking your local drugstores. I stalk mine at least once a week; walk in, see nothing, walk out. I’m waiting for the day they accuse me of stealing. Ha!
That is the COOLEST thing I have ever seen!
NEVER game making my own polish a thought..but what a cool idea!
I do layer mine alot..THAT is always fun..
I’m with Tiff – the mixed, mixed w/ pigment & layered polishes look FANTASTIC! I’ve always loved “Open Sky” but had just the problem you mention… now I have GOT to get a bottle of “Blue Moon Lagoon” & get the look in your photo! I learn so much from your blog- thanks again!
wow, the things I learn on your blog!
I would’ve never thought to mix polish. Can’t wait to get all science experiement on my polishes!
Great post-i really love the idea of Frankenpolish, and there are so many great pigments out there to try! I especially love the pic of your LPAD/DS Exclusive mix. Thanks again for such an enjoyable read
Stef
[...] All Lacquered Up shows you how to customize your polish to create that perfect shade [...]
I’ve been blending my own nail gloss shades since teenhood and i do mix brands.
Any brand colorless or “natural tint” nail polish = Opi’s Princesses rule = something I call Cupid’s Crystal
Any bright yellow shimmer frost + any red shimmer frost = a color I call Flaming Desire
I just bounced here from a recent post, but I’ve tried mixing clear nail polish and food coloring before. A problem is that the food coloring tends to settle, but it creates a great looking juicy tint. I wanted a clear polish with a tint of red (inspired by red cellophane and strawberry juice tones) and it worked out wonderfully.
HI! LONGTIME LURKER HERE!
i tend to go kind of the boring/classic route with a sheer blush, peach or pink (my favorite colors are essie mademoiselle and CND lighten up)… in the summer, however, my fingers look a little too stuffy, so i like to layer CND mother of pearl over the pink so it sparkles a little bit.
my toes however, are always painted an array of crazy colors… my favorite combo being nicole by OPI ink-a-dink-a-pink over CND passionfruit poppy (makes it a nice hot pink) or CND souvenir junkie over rimmel tequila sunrise (bright shimmery orange but not highlighter colored).
last of all,i always marvel at how you keep those cuticles of yours looking so absolutely perfect and how you get the application right EVERY SINGLE FREAKING TIME!
lots of love for your blog, ines
hey i have the same purple but it is called purple potion, but it is sally hanson xtrem wear purple potion
This is a very handy guide; I’ve blended polish for years but never thought to mix pigments into clear lacquer! I have a question, though: has anyone tried to give clear polish a tint, so that there’s really no opacity but it’s colored, almost like a cellophane look? I’m trying to figure out how to do this but don’t know what I could safely add to achieve that effect.
@morgan:
Yup! I did it with clear nailpolish and food coloring. The food coloring does tend to sink to the bottom overtime but you can always add the little metal balls, and, even though the coloring sinks, the color of the polish remained the same.
I did this by just guess and check. I added some food coloring, and then tried it on, added more, tried it on, etc. I did it with red and got this strawberry juice color.
Good luck!
I’ve achieved my ultimate neutral nail by layering Lippman Collection’s Sarah Smile and Prelude to a Kiss. Now I’m inspired to find a little bottle and just mix ‘em together!
Hey Michelle, what an awesome post! I’ll definitely have to try mixing stuff into clear polish, that shade turned out to be gorgeous!
How much pigment did you need to get that level of opacity? And do you think it would work with regular eyeshadow? (I’ve got some d/s shadow that is totally mediocre, but that is the EXACT polish colour I’ve been craving and failing to find…)
I just started reading your blog not too long ago and I’m LOVING IT!!!
First of all I’m a fellow green lover. It’s been my fav color since I can remember, so you drew me right in with that.
I love this post! I actually didn’t think anyone else did this.
I mixed my first polish when I was about 11.
I wanted a dark vampy red and couldn’t find one (that I could afford at least).
SO I took a bottle of Red and a bottle of black (Both Wet n Wild) and made my own!
I’ve layered before but this frankenpolish thing is totally new to me (and totally genious). I’m a polish novice but my collection is growing with my knowledge thanks to ALU. How exactly does frankenpolish work? Do you mix the different colors into an empty bottle to get your desired shade? How do you get it out of one bottle into another? Is there anything that can be put in the bottle that will mimic a ball? Lastly, how do you get such perfectly polished nails any tips or do I just practice, practice, practice?
P.S. Mixing Mac pigment with clear polish…OMGsh it’s ddouble duty perfection!!!
I like to use small glass sead beads for polish mixing especially DUD beads that the hole is missing or jammed
Wow this is a great post. I can’t believe for the past couple of months that I was reading and learning from a few nail blogs that I didn’t know what Frankens were LOL Your post here taught me about it and I didn’t know it was basically custom made polishes that you make on your own Thank you for sharing
Thanks for the great post, I never thought of mixing pigments with polish!
My face franken I have made was 90% white cream (i used an unamed Sally Hansen one from a french manicure kit) and 10% Sally Hansen Xtreme Wear “blew me away”
GORGEOUS shade, pale blue pastel cream, very similar to ChG “For Audrey” but a bit paler