Tips and Tricks
7 Tips For Avoiding Nail Polish Stains
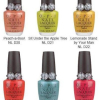
 Even though I get excited when fall comes and I break out my favorite deep, dark polishes, there’s always one caveat to wearing them… staining. Whether it’s during application or removal we’ve all experienced the irritation of polish stains on the skin. If you’ve ever worn a deep blue, you KNOW what I’m talking about. OPI DS Fantasy, I’m looking at you! Smurf hands aren’t cute except maybe on Halloween and even then blue skin isn’t exactly the hotness.
So one of my missions while backstage during New York Fashion Week was to get some tips from the pros working behind the scenes. I’ve combined their best advice with a couple of my own ideas and a quick tutorial video to help you wear your vampies with ease. |
Orly Nail Rescue Saved Me. It Can Save Your Nails Too!
 I’ve told you about my DDS (Danny Devito Syndrome) in the past and it reared its ugly head just before my trip to Vegas. You see, my thumb nail split and peeled which fed into my tendency to pick at things. So of course I peeled back the split layer and made things worse. Even with a ridge filling base coat I could see the unevenness in my thumb nail. Not to mention the fact that one wrong move would have just torn that piece off. That’s when Orly Nail Rescue came into my life. I’ve told you about my DDS (Danny Devito Syndrome) in the past and it reared its ugly head just before my trip to Vegas. You see, my thumb nail split and peeled which fed into my tendency to pick at things. So of course I peeled back the split layer and made things worse. Even with a ridge filling base coat I could see the unevenness in my thumb nail. Not to mention the fact that one wrong move would have just torn that piece off. That’s when Orly Nail Rescue came into my life.
I met with a rep from Orly at Cosmoprof and we were discussing treatment products. She told me of her love for Tough Cookie (I’ll be testing it soon) and I told her about my nail issue. She immediately grabbed for a Nail Rescue kit, saying it would literally save my nail. Considering that I get these kinds of splits often, I figured it was worth a shot. See the results, after the jump! |
It’s an easy 3 step system that left my nail with a flawless surface. Included in the kit is a bottle of Nail Glue, Nail Repair Powder and a Buffer. As demonstrated in the image below you just Brush, Dip and Smooth! Step 2: Immediately dip your nail into the Nail Repair Powder. Orly’s Nail Rescue Kit is available online at OrlyBeauty.com ($9) or Head2ToeBeauty.com ($4.95) and in stores at Sally Beauty Supply ($6.99). What’s your favorite method for repairing broken nails? Have you tried Nail Rescue? Share!
 As you can see in the “before” pic (left), the tear was pretty big and left me with a flimsy piece of nail that was barely hanging on. I know a lot of people use nail glue and patches or pieces of tea bag to fix breaks but Orly Nail Rescue seems much simpler to me.
 Step 1: Clean the nail bed and brush the nail glue over the entire nail, avoiding cuticles. Tip - If you are fixing an uneven area, like I did, you’ll want to repeat this process using the glue on the lower section ONLY to even the nail surface.
 Make sure you brush off the excess powder.
 Step 3: Buff the nail surface smooth. This was my first attempt and I did repeat the steps to even out the broken layer. As you can see, it’s not a beautiful look but it’s smooth, even and ready for polish while you grow out the breakage.
 You can’t even tell my nail is broken!
 Removal: Soaking in acetone will remove the hardened powder which means you MUST use a non-acetone remover when taking off your polish.
ALU Nail Tip – Removing Pen Marks
 A reader contacted me yesterday via Twitter to see if I had any tricks for removing pens marks from her nails without ruining her manicure. I’ve had it happen to me from time to time but never thought it was a regular occurrence for others. Since I do my own manicures, I usually just redo the nail at home. A reader contacted me yesterday via Twitter to see if I had any tricks for removing pens marks from her nails without ruining her manicure. I’ve had it happen to me from time to time but never thought it was a regular occurrence for others. Since I do my own manicures, I usually just redo the nail at home.
But when you pay to get a manicure in a salon, the last thing you want to do is wreck a nail over a silly pen mark. So I wondered if any of the at-home remedies for removing ink from fabric/carpet would work. The most common are rubbing alcohol, nail polish remover (that’s out!) and hairspray. Hmm, hairspray. That shouldn’t harm lacquer but would it remove the stains? I grabbed a pen and a canister of hairspray and here are the results… |

Consider that ink GONE! Now I got a little overzealous with my drawing so I ended up making a couple dents in the polish from the pressure but otherwise, everything was removed and it didn’t harm my glossy top coat in the least.
Do you have any unique nail tricks to share? What are your most common nail stain issues? Are you regularly afflicted by pen stains? If you try this tip at home, let me know your results.
Having A Bling-asm Over Rescue Beauty Lounge Spring
 There’s a party on my nails and you’re all invited. I’m talking about the Spring collection of polishes from Rescue Beauty Lounge. RBL founder Ji Baek went for all that is glam with a set of three sparkletastic shades. In the rough economic situation we’re all facing, it’s Ji’s thought that these glitzy creations will add a little luxe to your life at a time when high end spending is being drastically cut. There’s a party on my nails and you’re all invited. I’m talking about the Spring collection of polishes from Rescue Beauty Lounge. RBL founder Ji Baek went for all that is glam with a set of three sparkletastic shades. In the rough economic situation we’re all facing, it’s Ji’s thought that these glitzy creations will add a little luxe to your life at a time when high end spending is being drastically cut.
Check out my swatches and review after the jump! |
I’m not normally a glitter-bomb loving kind of girl. Mainly due to the rough finish and irritating removal process. Though I have to say that compared to some I’ve tested, Ji used a relatively fine glitter and trapped it in a thicker jelly-like clear base to aid the texture issue but removal still isn’t a joy. And I’m pleased to say that I only needed one coat of Seche Vite to get a glass like finish (other brands have required two).
Removal Tip: Add a coat of polish/base/top before removing. Adding a new layer of wet lacquer softens the polish underneath, making it easier to swipe off.
What you see below is two medium-thick coats of polish with no top coat. I love that it stays sparkly instead of getting all bumpy and matte.
Locavore looks very green in the bottle but it’s deceiving. On the nail it reminds me of Mardi Gras. A mixture of metallic glitter hues, much like a shiny masquerade mask.
Frugalista is an aluminum foil, silver metallic peppered with purple flecks. Purple is an underlying theme between the three shades but it stands out most in Frugalista. I have to say, this is the hands down winner for me. I love a purple and mixing it with silver is like perfection. 
Look Rich Be Cheap‘s gold glitter is much softer, not as yellow, in person yet it has a lot of fire and brilliance. Gold accents, more than silver, have been popping up on the runways and that makes Look Rich Be Cheap very fashion forward. So you’re not sure about glitter, can these still be for you? If you love the look of polish but are shy about full on sparkle nails try icing your tips for a funky french manicure or add a thin layer over another color for subtle sparkle or wear them on your toes. At that distance, the bling appears less powerful and, for a lack of better words, in your face.
The Spring bling polishes from Rescue Beauty Lounge retail for $18/ea are available now at RescueBeauty.com.
Glamour Says I’m a VIP Beauty Blogger
 A few months back, one of Glamour’s writers contacted me to provide some of my favorite nail tips for a story she was working on. Well, the folks at Glamour.com have put a couple of them to use in a feature with four of my fellow bloggers. We’ve been named VIP Beauty Bloggers. A few months back, one of Glamour’s writers contacted me to provide some of my favorite nail tips for a story she was working on. Well, the folks at Glamour.com have put a couple of them to use in a feature with four of my fellow bloggers. We’ve been named VIP Beauty Bloggers.
Head on over to Glamour.com to check out the fab beauty tips Amber from Beauty Bloggin Junkie, Daneen from Spoiled Pretty, Julia from All About The Pretty, Patrice from AfroBella and I shared. |