Tips and Tricks
My First (and LAST) Water Marble Manicure
 I should really call this manicure “An Afternoon of Frustration” because that’s how trying to create a water marble manicure left me feeling; FRUSTRATED! Those of you who have mastered the technique, I bow down to you. I honestly have no desire to try this ever again but since I made the effort, I thought I’d share my experience with you.
A few years back when China Glaze introduced the OMG! holographic collection, they posted a tutorial for their “Color Swirl” manicure and I was intrigued but intimidated by the process. Since then a whole mess of YouTubers have made countless water marble tutorials including lots of great tips and tricks to make the technique easier. I found myself watching a few this morning and got inspired. Find out more about the water marble technique and my adventure trying to recreate the look after the jump! |
Nail Tip – The Slimline Technique
 A few weeks ago, I unofficially polled you all about my nail length. Whether I should keep the slightly longer shape I showed in my Zoya Sparkle review or go back to my usual short tips. Ultimately I decided that a filing was in order for two reasons:
1. Being an accident prone klutz, I’m certain to break a nail as soon as it gets more than a few millimeters past my fingertip. 2. I just prefer the look of my nails when they are short. My ring fingernail tends to get a little wonky as it gets longer. The problem with keeping my nails “active length” is that I’m saddled with short, wide nail beds that look more stubby than chic. So what’s a girl to do when she doesn’t want the hassle of long nails but desires a slim, elongated look? That’s the exact I asked CND’s Roxanne Valinoti backstage during Fashion Week. Roxanne shared a great application tip she dubbed “The Slimline Technique.” It’s very simple and really does thin the shape of the nail. Check out my example above using OPI Funkey Dunkey and then find out more about it after the jump! |
OPI Mad As A Hatter Wear Test
I’ve been reading your comments about the glitters from the OPI Alice In Wonderland collection and see that quite a few of you have been experiencing major chipping issues. I thought I would share the results of my unintentional wear test with Mad As A Hatter.
You see I wore MAAH for NYE and because I can be extremely lazy AND I hate removing glitters (the soak off process is arduous) I ended up leaving the polish on my right (non-photographed) hand for NINE DAYS. Yes, I walked around for almost a week with a blinged out right hand and random skittles on the left. No, I really don’t care about the stares I undoubtedly received. Don’t judge!
Anywhoodle, when I finally went to remove MAAH, I thought I should document how well it lasted on me. Which is why your comments about chipping are so surprising. I used one coat of Nubar Foundation Base Coat, 3 layers of MAAH and 2 coats of Olan Labs Quick & Slick Top Coat. Now I did get a chip on my left thumb on NYE but that was a Wii related accident. You have to admit, for nine days, the polish looks pretty good.

That makes me curious… those of you that have experienced chipping and poor wear from your Alice in Wonderland glitters, what products are you using and how many layers of each? Remember, the thicker the coats and the more coats you use, the more prone you are to chipping. So my first suggestion, not knowing your technique, is to apply thin coats of everything and see if that helps.
A Lace Nail Tutorial
 I’m sure you remember seeing these amazing lace nails created by Celebrity Manicurist Elle. I posted about the lace nail trend back in September when Blake Lively and Jennifer Lopez were spotted wearing the look. Scratch Magazine loved it so much, they featured it on their December cover.
Since then I’ve seen various tutorials pop up on YouTube but none of them have looked as good or been as detailed as this one by LovelyInstinct so I thought I’d share. She uses a different method than Elle in that she applies a base coat of color underneath the lace and a lot more products. Those of you that aren’t a fan of seeing your natural nail through the lace, this is a great alternative. To recap, these are Elle’s instructions: |
Have any of you tried lace nails yet? Do you have any application tricks or tips? If you’re not a DIY gal, would you request this look from your manicurist?
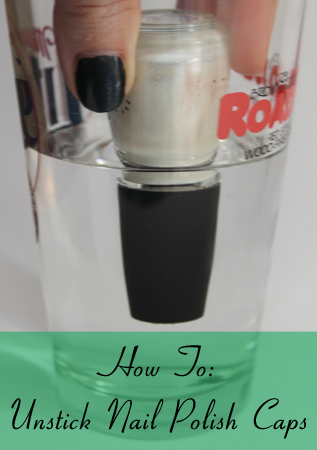
Nail Tip – Loosening Stuck-on Bottle Caps
 Has opening a bottle of nail polish ever made you feel like the weakest person on the planet? Have you struggled with a stuck-on cap that’s even more air-tight than a jar of pickles? I know I have! This morning in fact. It’s like they’re sealed by body builders or something.
While OPI seems to be the worst in terms of new bottles, I want to kick myself when a bottle cap is stuck due to my own laziness. I don’t always take the time to clean excess polish from the rim of my bottles and when that stuff dries, it’s like glue!
Sure you can get all muscleman on the bottle but if you’re too rough, it can break. I don’t know what’s worse, staring at the lacquer you can’t apply in a stuck bottle or a broken mess of spilled polish on the floor. So what’s the trick?
1. If it’s simply that the bottle cap is too slippery for you to grip, try wrapping a rubber band around the neck or using a rubberized jar opener (pictured above) but don’t force it.
2. Dip the bottle in hot water for a couple minutes. The heat from the water will liquefy the dried polish so you can easily unscrew the cap. Just don’t submerge the bottle. Extreme heat can ruin the formula plus you can lose the label if that gets wet. Oh and don’t forget to clean up the excess polish from the rim.