ALU’s 365 of Untrieds – 4th of July Manicure with Milani One Coat Glitters
 365 of Untrieds is my personal challenge to weed through the polishes in the ALU stash that I’ve been wanting to try but just haven’t gotten around to.
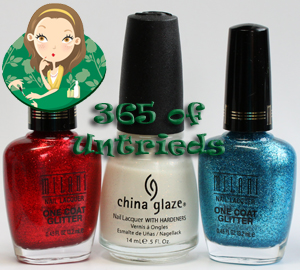
To celebrate Independence Day in the US, I decided to get my red, white & blue sparkle on. I even planned to get all crafty incorporating scotch tape and the result ended up being one giant mani-fail! Of course, instead of getting down on myself for it, I’m learning from my mistakes and sharing my missteps with you. To create today’s look I went straight for my Milani One Coat Glitters in Red Sparkle and Blue Flash. When you want full-on sparkle without multiple, thick layers of polish, look no further. It’s just a shame they didn’t come out with a white version to complete my manicure. In order to conserve my favorite white sparkler, China Glaze White Kwik Silvr, I pulled out another untried, China Glaze Cloud Nine from the Specialty Glitters collection. |
Formula & Application: Milani nail polishes are 4-Free (including formaldehyde resin). The bottles have a tapered, black shiny plastic cap with a long, thick, round brush. The brushes on Milani polishes are bigger than most and combined with the flexible bristles they allow for optimal coverage of the nail plate.
The only downside here is that the One Coat Glitter formula is kind of thick so it kind of plops on the nail which doesn’t really allow for phenomenal control. Thankfully glitters are pretty forgiving so any uneven brush strokes around the cuticle aren’t noticeable from an average distance.
Regarding the “one coat” coverage promise, Milani comes close but doesn’t quite hit the mark. The first coat definitely covers better than most glitter polishes but it’s not completely opaque. I would imagine to get it done in one coat you’d need to apply the polish pretty thick which is usually a formula for chiptastic nails. Applying two thin-medium coats will give the best results.
China Glaze is a 3-Free brand with a round brush that is both medium in length and firmness with enough give to allow for ease of control. The cap is slightly tapered and made of smooth plastic that is comfortable to hold.
The Specialty Glitters all differ in their opacity and consistency. Cloud Nine is squishy and milky and tries hard to be opaque in spite of the plethora of glitter packed into its base but doesn’t really succeed. I ended up layering it over China Glaze Snow to avoid having to use 4+ coats.
![]()
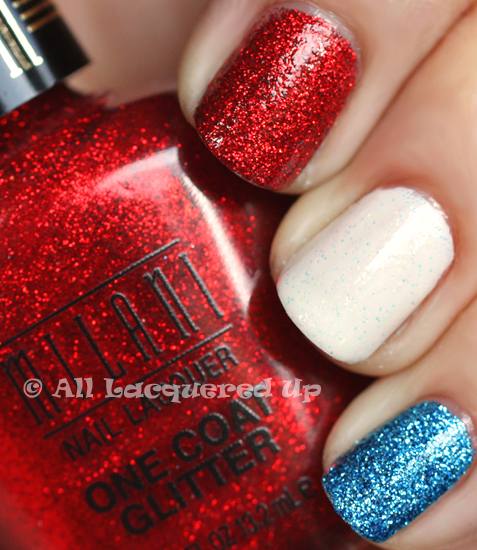
Milani Red Sparkle and Milani Blue Flash are both pretty straight up glitters. They don’t have any noticeable pigment to their bases, just tons and tons of glitter. Blue Flash is a cross between cyan and royal and Red Sparkle reminds me a lot of China Glaze Ruby Pumps. As you can see, Blue Flash mellows and darkens when layered over Red Sparkle.
China Glaze Cloud Nine has a milky white base packed with opalescent flakie glitter that looks like burning embers when the light hits it. The flakes don’t really show up on camera but they made me think of the fiery showers the float down from the sky after a firework explodes. China Glaze Snow’s opacity made it the perfect base since I only needed one coat.
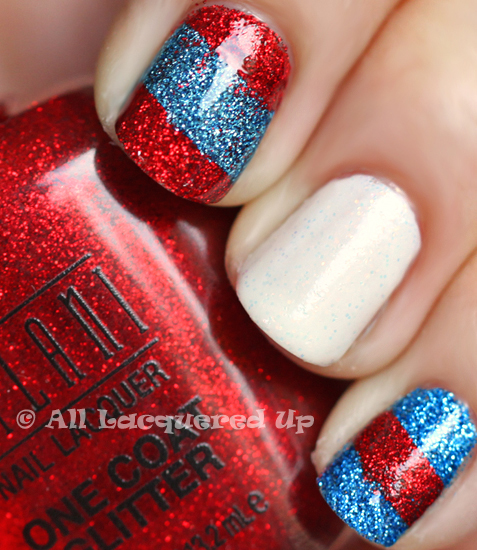
Now let’s discuss the disaster you see above. I attempted a diagonal stripe scotch tape manicure using the two Milani glitters but it just didn’t work out. After my third attempt at getting the middle finger perfect failed, I just gave up. It’s a holiday and I want to enjoy it, not spend it frustrated with my polish.
What went wrong? Well, I thought I would speed up the process by using a UV top coat. I have a few and opted for Seche Ultra-V because it’s somewhat thick and would cover up the texture of the glitter. Well, even though the polish seemed solid after three minutes of curing in a UV lamp and waiting like 5 minutes, it was still pliable and came up with the tape. I attempted to fill in the bald spots but that just made things worse. I also didn’t wait long enough after adding the stripes to put on my top coat and that caused some of the glitter to bleed. Not a good look.
While I like the concept, the execution definitely needs some work. Here’s what this experience taught me:
- The Milani glitters are too thick to try the UV top coat trick. They just don’t cure that fast
- If the tape pulls up the polish, start over. Trying to cheat and fill in spots just makes for more mess.
- Patience, patience, patience. Admittedly this is not my strong suit. Let’s just say, I could never be a teacher. If you don’t have the time to dedicate to this process, stick to solid color nails or do free hand art.
- Tapping the scotch tape on your palm keeps it from being too sticky but don’t remove too much of the tackiness. The tape I used on my pinkie nail wasn’t sticky enough and it lifted up, allowing polish to seep underneath. I tried to push the glitter with an orange wood stick and made things worse (see #2).
In the end, a basic red, white and blue look ended up being the winning combo. As I mentioned above, these glitters dry with TEXTURE. A thick coat of Seche Vite or mulitple layers of a regular top coat are needed and even then they aren’t completely smooth but that doesn’t take away from the sparkle.
![]()
Bottom Line: The Milani One Coat Glitters are a glitter fiend’s BFF. They give great coverage in just a couple coats and deliver a ton of bling at a wallet friendly price. If China Glaze Cloud Nine was more opaque it would be a winner but it just didn’t live up to my expectations. It’s basically a milky version of Sally Hansen Hidden Treasures (or Nubar 2010) with smaller, less plentiful flakes. In hindsight, either of those would have been better over Snow than Cloud Nine.
365 of Untrieds Stash/Share Verdict: Milani Red Sparkle & Blue Flash are staying in the STASH and I’m kicking China Glaze Cloud Nine to the SHARE bin.
Milani One Coat Glitters are available at drugstores nationwide and online at MilaniCosmetics.com and CherryCulture.com. Milani nail polishes retail for $4.99/ea for a .5oz bottle.
Did you create a special 4th of July manicure for the holiday? Tell us about it. Are you a fan of the Milani One Coat Glitters?
Disclosure: I purchased the Milani nail polishes. China Glaze Cloud Nine was provided by China Glaze. For more info view my Disclosure Policy.







Aww, I like end result! I too attempted a scotch tape holiday mani and there were many many many colorful words dropped during the process, hahah! It’s definitely something that takes practice, and your tip about sticking the tape to your palm a few times is a definite must. Without that I would have been screwed.
Even though the curing failed and you had to fill in spots, I think the idea is so great and the outcome is still gorgeous When I do tape manis I often do the base colour in the evening before I want the finished manicure, and start taping the next day. I wish it was quicker to do, though!
I did all ten nails flat white and then alternated Red and Navy OPI shatters!
That sounds nice!
I know you think it looks terrible, but I’ve never even attempted any sort of nail art and I think it looks great! In any case, though, I also like the manicure you ended up with!
For some reason I can’t read the story; it takes me right to the comments.
That keeps randomly happening at first with some posts and I don’t know why but it should be fixed now.
I always get impaitent with tape manis! I just want it to dry! hahaha, It does really pay off if you wait tho
Aw, I thought the first mani looked great! I’ve tried the tape mani before and it has come out great, but then again I didn’t use glitter. I just don’t have the patience to do it often!
Happy 4th of July!
Great colors and thanks for sharing the reality that sometimes it just doesn’t work as planned!
off topic here, I found your perfect cuticles on amazon, they even watermarked over your photo!
http://www.amazon.com/nubar-2010/dp/B003STPN4S/ref=pd_sim__3
boo on them!
Long time fan, just thought i’d let you know!
Wow…I couldn’t even see Cloud Nine at first. I had to tilt my screen to see the blue sparkles.
The glitters look really amazing! Just so.. GLITTERY!!
On a side note, I’ve tried the stripe manicure thingy and it seemed to work fine for me. Here’s what design I copied: (not my picture) http://thelacquerlog.wordpress.com/2011/06/03/canucks-nails/
- I basically used a Revlon blue base (BIG MISTAKE!!!) It took forever to dry and had so many bubbles, but fortunately the colour was dark enought that it hid the bubbles.
- Since I couldn’t wait, I used the Revlon fast dry top coat (which worked really well!).
- I then took the tape and stuck it to my skin a few times then put it on, only pressing down the line when the polish would go.
- I used a SH cheapie for the white stripe
- then I free handed the green.
I found that pulling off the tape at an angle worked best, and it did not stick to/pull on the revlon top coat. To prevent the white bleeding on the darker colours (since this part was the thickest), I applied the Revlon top coat to the finished mani at an angle, following the stripes. In the end it worked out very well, It lasted me a week of work, school, cleaning + partying with just a little repairable tip wear.
Hope you can find this helpful! =)
– Kim
Ooh I forgot to say that I’m from Vancouver and it was a Canucks manicure for the playoffs! Happy 4th of July to all you Americans!
I love the manicure. The first manicure you did looked just fine.I have only one Milani One Coat Glitters and that’s Silver Dazzle. I brought it because I saw the swatch here on ALU. I brought it at Walmart, but I guess they don’t sell them anymore because I haven’t seen them since…Anyway Happy 4th of July.
I think the diagonal pattern actually looks good! My first thought on seeing it was “That’s so cool!” I guess you’re just too much of a perfectionist :p
Is Blue Flash a good substitute for OPI Absolutely Alice?
I tried a scotch tape mani once and it worked rather well. I have to say though that I added the black tips a day after I painted my nails, so of course it was 100% dry.
Anytime I try to stick something to my nails, it ends tragically. I’m just not patient enough.
I also think your manicure looks awesome, even with the flubs.
Super cute!!
I keep my eyes open for the “One Coat”s…I don’t have the red one….yet
Awwww. Nice try — looks good anyway.
OMG looks great!! No one could see the glitter mixing unless they looked as close as the photos were! Soooo patriotic!
I LOVED my 4th of July manicure… it was my first attempt at “nail art”, although it wasn’t very involved. I used Broadway brand fake nails (just a basic french)bc my real nails were too short right now to fit the design. I filed the finish off of each ring finger so that the white dissapeared, then painted them metallic royal blue (LA Colors, a cheapie from dollar tree, not sure of the name). Then I used french tip guide (the little stickers) along the edge of the tip on the other nails, and did the tips in OPI Ruby Pumps. I added a second coat of blue to the ring fingers, then using an orange stick carefully placed some white stars on there… 2 larger outlines, and three teeny tiny solid ones on each nail. I got the stars at Sally’s, they are actually “rainbow” stars, sort of an aurora borialis effect, but the back was solid white. I finished the whole manicure off with two coats of Out the Door (the ring fingers got one extra thick coat, to smooth out the edges of the stars). I wish I could upload a pic on here, they were AWESOME!! and wore beautifully… NO chipping after a week, but I did loose one of the teeny tiny stars, although it wasn’t noticable. The only mess ups were a bit of color bleed bc I should have waited longer before applying the topcoat… so a few of the nails had light red streaks in the middle, and some of the white stars had hints of blue on them. But it wasn’t very noticible. And it got rave reviews!! Lovin on this holiday nail art!